Monday, March 4, 2013

Posted by Fabrice Di Meglio, Android Frameworks Team

Android 4.1 (Jelly Bean) introduced limited support for bidirectional text in TextView and EditText elements, allowing apps to display and edit text in both left-to-right (LTR) and right-to-left (RTL) scripts. Android 4.2 added full native support for RTL layouts, including layout mirroring, allowing you to deliver the same great app experience to all of your users, whether their language uses a script that reads right-to-left or one that reads left-to-right.


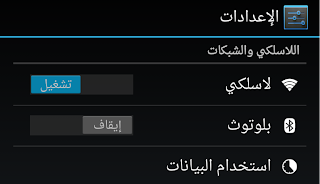
If you do nothing, your app will not change — it will continue to appear as it currently does. However, with a few simple changes, your app will be automatically mirrored when the user switches the system language to a right-to-left script (such as Arabic, Hebrew, or Persian). For example, see the following screenshots of the Settings app:


To take advantage of RTL layout mirroring, simply make the following changes to your app:


  1. Declare in your app manifest that your app supports RTL mirroring.

    Specifically, add android:supportsRtl="true" to the <application> element in your manifest file.


  2. Change all of your app's "left/right" layout properties to new "start/end" equivalents.


    • If you are targeting your app to Android 4.2 (the app's targetSdkVersion or minSdkVersion is 17 or higher), then you should use “start” and “end” instead of “left” and “right”. For example, android:paddingLeft should become android:paddingStart.

    • If you want your app to work with versions earlier than Android 4.2 (the app's targetSdkVersion or minSdkVersion is 16 or less), then you should add “start” and end” in addition to “left” and “right”. For example, you’d use both android:paddingLeft and android:paddingStart.


For more precise control over your app UI in both LTR and RTL mode, Android 4.2 includes the following new APIs to help manage View components:


You can even create custom versions of layout, drawables, and other resources for display when a right-to-left script is in use. Simply use the resource qualifier "ldrtl" to tag your resources, meaning “layout direction right-to-left”. To debug and optimize custom right-to-left layouts, HierarchyViewer now lets you see start/end properties, layout direction, text direction, and text alignment for all the Views in the hierarchy.


It's now easy to create beautiful Android apps for all your users, whether they use a right-to-left or left-to-right language. We look forward to seeing some great apps!


Tuesday, February 26, 2013

Google Play Services is our platform for offering you better integration with Google products, and providing new capabilities to use within your apps. Today we’re rolling out Google Play services v3.0, which includes Google+ Sign-In and Google Maps Android API improvements.


Google+ Sign-In


Google+ Sign-In lets users sign in to your Android app with their existing Google credentials, and bring along their Google+ info for an upgraded experience. In addition to basic authentication, today’s release includes features that can accelerate both app downloads and engagement.


Over-the-air installs from your website

After signing in with Google on your web site, users will now have the option to install your Android app on their devices instantly. They’ll enjoy a seamless desktop-to-mobile experience, and you’ll be able to drive more downloads. Linking your web site and Android apps is as simple as registering your project and clients with the Google APIs console.


App customization

When users sign in with Google, they can now bring their Google+ info with them (like their public profile, and the people in their circles). This lets your app welcome them by name, display their picture, connect them with friends, and lots more.


Interactive posts

Shares from your app can now include calls to action (like “listen,” “RSVP,” and “check-in”), custom thumbnails, and brand attribution — all of which help them stand out in users’ Google+ streams. Clicking on an interactive post can also deep link to a specific piece of content inside your app, further improving engagement.


App activity that’s useful, not annoying

Users’ app activities will only be visible to the Google+ circles they specify (if any), and they’ll only appear when they’re relevant. Putting users in control, and not spraying their stream builds trust in your app, and encourages meaningful sharing.


Measure and monitor key metrics

Once your Google+ Sign-In integration is live, you’ll be able to measure and monitor downloads, total users, interactive post performance, and other key metrics. To set up Google+ Platform Insights for your Android app, simply connect it with your Google+ page.


More about Google+ Sign-In

To learn more about integrating with Google+ Sign-In, visit our developer docs. You can also read our announcement on the Google+ Developers Blog, or download some of the first apps to include this functionality.


Google Maps Android API v2


This release includes fixes for more than 20 bugs, including half of the top 10 issues filed in the Google Maps API issue tracker. These include improvements to map rendering and the behavior of markers and infowindows.


Also included are features like native support for new map shapes such as circles, anti-clockwise polygons, and the OnMyLocationChangeListener event, which is called when a change in location is detected.


Check out the product documentation for a complete set of release notes.


More About Google Play Services


To learn more about Google Play services and the APIs available to you through it, visit the Google Services area of the Android Developers site.

Tuesday, February 19, 2013

random_droid


Following our talk "Security and Privacy in Android Apps" at Google I/O last year, many people had specific questions about how to use cryptography in Android. Many of those revolved around which APIs to use for a specific purpose. Let's look at how to use cryptography to safely store user credentials, such as passwords and auth tokens, on local storage.


An anti-pattern


A common (but incorrect) pattern that we've recently become aware of is to use SecureRandom as a means of generating deterministic key material, which would then be used to encrypt local credential caches. Examples are not hard to find, such as here, here, here, and elsewhere.


In this pattern, rather than storing an encryption key directly as a string inside an APK, the code uses a proxy string to generate the key instead — similar to a passphrase. This essentially obfuscates the key so that it's not readily visible to attackers. However, a skilled attacker would be able to easily see around this strategy. We don't recommend it.


The fact is, Android's existing security model already provides plenty of protection for this kind of data. User credentials should be stored with the MODE_PRIVATE flag set and stored in internal storage, rather than on an SD card, since permissions aren't enforced on external storage. Combined with device encryption, this provides protection from most types of attacks targeting credentials.


However, there's another problem with using SecureRandom in the way described above. Starting with Android 4.2, the default
SecureRandom provider is OpenSSL, and a developer can no longer override SecureRandom’s internal state. Consider the following code:


SecureRandom secureRandom = new SecureRandom();
byte[] b = new byte[] { (byte) 1 };
secureRandom.setSeed(b);
// Prior to Android 4.2, the next line would always return the same number!
System.out.println(secureRandom.nextInt());


The old Bouncy Castle-based implementation allowed overriding the internally generated, /dev/urandom based key for each SecureRandom instance. Developers which attempted to explicitly seed the random number generator would find that their seed replaces, not supplements, the existing seed (contrary to the reference implementation’s documentation). Under OpenSSL, this error-prone behavior is no longer possible.


Unfortunately, applications who relied on the old behavior will find that the output from SecureRandom changes randomly every time their application starts up. (This is actually a very desirable trait for a random number generator!) Attempting to obfuscate encryption keys in this manner will no longer work.


The right way


A more reasonable approach is simply to generate a truly random AES key when an application is first launched:


public static SecretKey generateKey() throws NoSuchAlgorithmException {
// Generate a 256-bit key
final int outputKeyLength = 256;

SecureRandom secureRandom = new SecureRandom();
// Do *not* seed secureRandom! Automatically seeded from system entropy.
KeyGenerator keyGenerator = KeyGenerator.getInstance("AES");
keyGenerator.init(outputKeyLength, secureRandom);
SecretKey key = keyGenerator.generateKey();
return key;
}


Note that the security of this approach relies on safeguarding the generated key, which is is predicated on the security of the internal storage. Leaving the target file unencrypted (but set to MODE_PRIVATE) would provide similar security.


Even more security


If your app needs additional encryption, a recommended approach is to require a passphase or PIN to access your application. This passphrase could be fed into PBKDF2 to generate the encryption key. (PBKDF2 is a commonly used algorithm for deriving key material from a passphrase, using a technique known as "key stretching".) Android provides an implementation of this algorithm inside SecretKeyFactory as PBKDF2WithHmacSHA1:


public static SecretKey generateKey(char[] passphraseOrPin, byte[] salt) throws NoSuchAlgorithmException, InvalidKeySpecException {
// Number of PBKDF2 hardening rounds to use. Larger values increase
// computation time. You should select a value that causes computation
// to take >100ms.
final int iterations = 1000;

// Generate a 256-bit key
final int outputKeyLength = 256;

SecretKeyFactory secretKeyFactory = SecretKeyFactory.getInstance("PBKDF2WithHmacSHA1");
KeySpec keySpec = new PBEKeySpec(passphraseOrPin, salt, iterations, outputKeyLength);
SecretKey secretKey = secretKeyFactory.generateSecret(keySpec);
return secretKey;
}


The salt should be a random string, again generated using SecureRandom and persisted on internal storage alongside any encrypted data. This is important to mitigate the risk of attackers using a rainbow table to precompute password hashes.


Check your apps for proper use of SecureRandom


As mentioned above and in the New Security Features in Jelly Bean, the default implementation of SecureRandom is changed in Android 4.2. Using it to deterministically generate keys is no longer possible.


If you're one of the developers who's been generating keys the wrong way, we recommend upgrading your app today to prevent subtle problems as more users upgrade to devices running Android 4.2 or later.


Thursday, February 14, 2013

Posted by Fred Chung, Android Developer Relations team


Android 4.2, Jelly Bean, introduced quite a few new features, and under the covers it also added a number of security enhancements to ensure a more secure environment for users and developers.


This post highlights a few of the security enhancements in Android 4.2 that are especially important for developers to be aware of and understand. Regardless whether you are targeting your app to devices running Jelly Bean or to earlier versions of Android, it's a good idea to validate these areas in order to make your app more secure and robust.


Content Provider default access has changed


Content providers are a facility to enable data sharing amongst app and system components. Access to content providers should always be based on the principle of least privilege — that is, only grant the minimal possible access for another component to carry out the necessary tasks. You can control access to your content providers through a combination of the exported attribute in the provider declaration and app-specific permissions for reading/writing data in the provider.


In the example below, the provider ReadOnlyDataContentProvider sets the exported attribute to "true", explicitly declaring that it is readable by any external app that has acquired the READ_DATA permission, and that no other components can write to it.


<provider android:name=”com.example.ReadOnlyDataContentProvider”
android:authorities=”com.example”
android:exported=”true”
android:readPermission=”com.example.permission.READ_DATA” />


Since the exported attribute is an optional field, potential ambiguity arises when the field is not explicitly declared in the manifest, and that is where the behavior has changed in Android 4.2.


Prior to Jelly Bean, the default behavior of the exported field was that, if omitted, the content provider was assumed to be "exported" and accessible from other apps (subject to permissions). For example, the content provider below would be readable and writable by other apps (subject to permissions) when running on Android 4.1 or earlier. This default behavior is undesirable for sensitive data sources.


<provider android:name=”com.example.ReadOnlyDataContentProvider”
android:authorities=”com.example” />


Starting in Android 4.2, the default behavior for the same provider is now “not exported”, which prevents the possibility of inadvertent data sharing when the attribute is not declared. If either the minSdkVersion or targetSdkVersion of your app is set to 17 or higher, the content provider will no longer be accessible by other apps by default.


While this change helps to avoid inadvertent data sharing, it remains the best practice to always explicitly declare the exported attribute, as well as declaring proper permissions, to avoid confusion. In addition, we strongly encourage you to make use of Android Lint, which among other things will flag any exported content providers (implicit or explicit) that aren't protected by any permissions.


New implementation of SecureRandom


Android 4.2 includes a new default implementation of SecureRandom based on OpenSSL. In the older Bouncy Castle-based implementation, given a known seed, SecureRandom could technically (albeit incorrectly) be treated as a source of deterministic data. With the new OpenSSL-based implementation, this is no longer possible.


In general, the switch to the new SecureRandom implementation should be transparent to apps. However, if your app is relying on SecureRandom to generate deterministic data, such as keys for encrypting data, you may need to modify this area of your app. For example, if you have been using SecureRandom to retrieve keys for encrypting/decrypting content, you will need to find another means of doing that.


A recommended approach is to generate a truly random AES key upon first launch and store that key in internal storage. For more information, see the post "Using Cryptography to Store Credentials Safely".


JavascriptInterface methods in WebViews must now be annotated


Javascript hosted in a WebView can directly invoke methods in an app through a JavaScript interface. In Android 4.1 and earlier, you could enable this by passing an object to the addJavascriptInterface() method and ensuring that the object methods intended to be accessible from JavaScript were public.


On the one hand, this was a flexible mechanism; on the other hand, any untrusted content hosted in a WebView could potentially use reflection to figure out the public methods within the JavascriptInterface object and could then make use of them.


Beginning in Android 4.2, you will now have to explicitly annotate public methods with @JavascriptInterface in order to make them accessible from hosted JavaScript. Note that this also only takes effect only if you have set your app's minSdkVersion or targetSdkVersion to 17 or higher.


// Annotation is needed for SDK version 17 or above.
@JavascriptInterface
public void doSomething(String input) {
. . .
}


Secure USB debugging


Android 4.2.2 introduces a new way of protecting your apps and data on compatible devices — secure USB debugging. When enabled on a device, secure debugging ensures that only host computers authorized by the user can access the internals of a USB-connected device using the ADB tool included in the Android SDK.


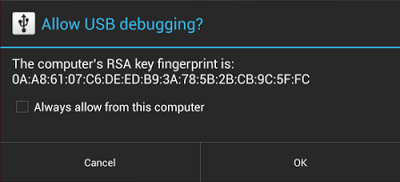
Secure debugging is an extension of the ADB protocol that requires hosts to authenticate before accessing any ADB services or commands. At first launch, ADB generates an RSA key pair to uniquely identifies the host. Then, when you connect a device that requires secure debugging, the system displays an authorization dialog such as the one shown below.


The user can allow USB debugging for the host for a single session or can give automatic access for all future sessions. Once a host is authorized, you can execute ADB commands for the device in the normal way. Until the device is authorized, it remains in "offline" state, as listed in the adb devices command.


For developers, the change to USB debugging should be largely transparent. If you've updated your SDK environment to include ADB version 1.0.31 (available with SDK Platform-tools r16.0.1 and higher), all you need to do is connect and authorize your device(s). If your development device appears in "offline" state, you may need to update ADB. To so so, download the latest Platform Tools release through the SDK Manager.


Secure USB debugging is enabled in the Android 4.2.2 update that is now rolling out to Nexus devices across the world. We expect many more devices to enable secure debugging in the months ahead.


More information about security best practices


For a full list of security best practices for Android apps, make sure to take a look at the Security Tips document.


Tuesday, January 15, 2013

Check out our latest Android developer story, this one from Smule, creators of AutoRap, Magic Piano, and Songify.


In this short video, the Smule team talks about their experiences launching on Android, the explosive global growth they’ve seen on Google Play, and some of the techniques they use to market and monetize their products effectively across the world.


Visit the Spotlight pages in the Android Developers site to see our growing list of developer stories.


Monday, January 14, 2013

Posted by R. Jason Sams, Android Renderscript Tech Lead


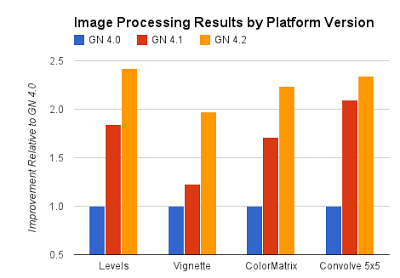
It’s been a year since the last blog post on Renderscript, and with the release of Android 4.2, it’s a good time to talk about the performance work that we’ve done since then. One of the major goals of this past year was to improve the performance of common image-processing operations with Renderscript.


Renderscipt optimizations chartstyle="border:1px solid #ddd;border-radius: 6px;" />

Figure 1. Renderscript image-processing benchmarks run on different Android platform versions (Android 4.0, 4.1, and 4.2) in CPU only on a Galaxy Nexus device.


Figure 2. Renderscript image-processing benchmarks comparing operations run with GPU + CPU to those run in CPU only on the same Nexus 10 device.


When you set out to improve performance, the first task is to measure it. To do this, we built a image-processing benchmark suite. The tests measure how long it takes to apply a given image processing operation to a roughly 1.7 million pixel bitmap. We then ran the benchmark using the same APK on the Galaxy Nexus and normalized the results from Ice Cream Sandwich to 1.0.


We made a few major improvements between ICS and Jelly Bean, which significantly reduced the overhead of short scripts as well as the cost of getting elements out of allocations. Going from Android 4.1 to Android 4.2, we added a number of performance improvements to the math library. Our hardware partners also made major contributions; ARM in particular provided numerous compiler improvements which greatly improved our ability to generate vector code.


Android 4.2 introduced another much more important change: For the first time on any mobile platform. we can use the GPU as a compute device. When run on a device that supports GPU compute, that same benchmark APK will run on the GPU. The chart in Figure 2 is normalized to the same basis as Figure 1.


The Cortex A15 in Nexus 10 is a very good CPU. However, that doesn’t mean we should leave resources idle. The Mali T604 is a very flexible and capable compute device capable of executing a large subset of RenderScript functionality. The green bar in Figure 2 shows what we can do when the Mali is enabled for RS compute. No effort is required on an app developer's part to enable this acceleration; the device will inspect each script and decide which processor to run things automatically. It’s important to note that some scripts can’t be run on the GPU, and such scripts will automatically run on the CPU.


The best part is it doesn’t end here. Performance work is an ongoing effort. RenderScript performance in applications will continue to improve over time as we continue to improve the platform.


To learn more about using Renderscript, see the Renderscript Computation developer's guide.


Tuesday, January 8, 2013

Posted by Tim Bray

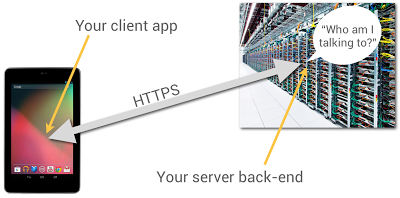
Most Android apps have some sort of server-side back end, to persist and share data. Even the most basic game needs to remember its players’ high scores. When you’re building your back end, one problem you have to solve is how the back-end code knows what app it’s talking to and who the person using it is.

You probably have HTTP endpoints for communicating with your client apps, but how can the server-side code be sure who’s sending messages to it? After all, anyone can send HTTP POST requests from anywhere; could they impersonate your users if they could guess their identities?

It’s really user-unfriendly to ask people to type in usernames and passwords on mobile devices. In particular, if someone has installed your app and given it permission to use the Internet and know your identity, they shouldn’t be pestered any more.

It turns out that Google Play services, now available on every compatible device running Android release 2.2 or higher, offers a good solution to this problem, based on the use of Google Accounts.

Summary

Doing this is a multi-step process, which I’ll outline in full, but here’s the short version: You use the GoogleAuthUtil class, available through Google Play services, to retrieve a string called an “ID Token”. You send the token to your back end and your back end can use it to quickly and cheaply verify which app sent it and who was using the app.

This capability is built into Google facilities such as App Engine’s new Cloud Endpoints feature, which bakes app/back-end identity into a simple programming model.

Now let’s get to the details.

App Registration

You’re going to have to use the Google API Console quite a bit in this process. You’ll need to make a new project for this purpose; while you can give it a nice human-readable name and graphical branding, it turns out that those resources aren’t used in this particular scenario.

You can also authorize this project to access a large number of different Google APIs; but once again, you don’t need to in this scenario.

You should give serious thought to the people you authorize as members of the project, since these are important administrative roles.

Make Client IDs

You’ll need to make two different OAuth 2.0 “Client IDs” for your project. The first one is a “Client ID for Web applications”. Once again, you can ignore all the labeling and branding stuff, you’ll just need the Client-ID string, which will look something like 9414861317621.apps.googleusercontent.com.

Now you’ll need to make another Client ID for your Android app. To do this, you’ll need to provide two pieces of information: your app’s package name and cert signature. The package name is just the Java-style reverse-DNS, as given in the top-level “package” attribute in your AndroidManifest.xml, for example com.example.identity.

To get your app’s cert signature, use the following shell command:

$ keytool -exportcert -alias <your-key-name> -keystore <your-key-store-file> -v -list

Copy the octets labeled “SHA1”, paste them into the Developer Console field, and create your app’s Client ID. Once again, all you’ll really need from the readout is the Client-ID string.

In Your Android App

You’ll need to call the Google Play services GoogleAuthUtil class to get an ID token; the procedure is as described in Obtaining an Access Token. There’s one extra bit of magic: the value of the scope argument to the getToken(email, scope) method. It has to be the string audience:server:client_id:X, where X is the Client ID of for the Web app, as described above. If our Client ID were the example value given above, the value of the scope argument would be audience:server:client_id:9414861317621.apps.googleusercontent.com.

Magic Happens

Normally, when you ask for an OAuth token, the person using the device sees a challenge, asking them if it’s OK to use their identity to get at some resource or other. But in this case, the system looks at the server-side Client ID in your scope argument, notices that it’s in the same project as your Android app, and gives you the token without pestering the user; they’ve already agreed to a relationship with you, the developer who controls that project.

Send the Token

When you’re ready to start talking to your server back end, you need to send the token string to it. The best way to do this is in the body of an POST message; you could put it in a URL parameter, but they’re often logged. You absolutely must use an HTTPS connection, to keep any men-in-the-middle from peeking at your token.

There’s no particular reason for extra round-trips; if you’re sending a game high score to your back end, just stick the ID Token string in as an extra argument.

Use the Token

When your server receives the token from your Android app, it’s really important that you verify it. This requires two steps:

  1. Verify that it’s really signed by Google.

  2. Verify that it’s really meant for you.

Verify Signature

It turns out that this is signed using a Google public/private key pair, and Google publishes the public keys (which we change regularly) at www.googleapis.com/oauth2/v1/certs; go ahead and have a look.

You have to verify that the ID Token, which is actually a JSON Web Token, was signed with one of those certs. Fortunately, there are decent libraries around to do this; in this post, I’ll give pointers for Java, Ruby, and PHP.

The libraries can cache the Google certs and only refresh them when required, so the verification is (almost always) a fast static call.

Verify Token Fields

It turns out that the ID Token has a JSON payload, and most libraries that validate the signatures also give it to you as a hash or dictionary or whatever. Thus, you can retrieve named fields, such as aud and azp and email.

First, you have to look at the field named aud and verify that it’s identical to your Client ID, the string you included in the Android app’s scope argument. Seriously, do not omit this step; if you don't verify the ID Token, then any other developer can spoof requests to your service.

Optionally, you can look at the field named azp (stands for “authorized party”) and verify that it is identical to the Client ID of your Android app. By the way, you can have multiple different Android client apps, each with its own Client ID, in that top-level project.

Let’s assume you’ve done all three of these things. Then, you know that:

  1. The token was issued by Google.

  2. The token was sent to a device that was being operated by the person identified in the payload's email field.

You also have high confidence that:

  1. The token was obtained by the Android app identified by the Client ID in the payload’s azp field.

The Client ID only has “high confidence” because non-compatible or rooted Android devices may be able to tamper with that information. But they won't be able to fake the Google signature or the authentication of the device user to Google.

What’s Next?

That’s up to you. You know which person and app you’re talking to, it’s up to you what to do with that information.

Code Fragments

Here’s a Java class that implements an ID-Token checker using the Google Java libraries:

import java.io.IOException;
import java.security.GeneralSecurityException;

import com.google.api.client.googleapis.auth.oauth2.GoogleIdToken;
import com.google.api.client.googleapis.auth.oauth2.GoogleIdTokenVerifier;
import com.google.api.client.http.javanet.NetHttpTransport;
import com.google.api.client.json.JsonFactory;
import com.google.api.client.json.gson.GsonFactory;

public class Checker {

private final List mClientIDs;
private final String mAudience;
private final GoogleIdTokenVerifier mVerifier;
private final JsonFactory mJFactory;
private String mProblem = "Verification failed. (Time-out?)";

public Checker(String[] clientIDs, String audience) {
mClientIDs = Arrays.asList(clientIDs);
mAudience = audience;
NetHttpTransport transport = new NetHttpTransport();
mJFactory = new GsonFactory();
mVerifier = new GoogleIdTokenVerifier(transport, mJFactory);
}

public GoogleIdToken.Payload check(String tokenString) {
GoogleIdToken.Payload payload = null;
try {
GoogleIdToken token = GoogleIdToken.parse(mJFactory, tokenString);
if (mVerifier.verify(token)) {
GoogleIdToken.Payload tempPayload = token.getPayload();
if (!tempPayload.getAudience().equals(mAudience))
mProblem = "Audience mismatch";
else if (!mClientIDs.contains(tempPayload.getIssuee()))
mProblem = "Client ID mismatch";
else
payload = tempPayload;
}
} catch (GeneralSecurityException e) {
mProblem = "Security issue: " + e.getLocalizedMessage();
} catch (IOException e) {
mProblem = "Network problem: " + e.getLocalizedMessage();
}
return payload;
}

public String problem() {
return mProblem;
}
}

If you wanted to do this in Ruby, you’d want to install the google-id-token Ruby gem, and do something like this:

require 'google-id-token'
validator = GoogleIDToken::Validator.new
jwt = validator.check(token, required_audience, required_client_id)
if jwt
email = jwt['email']
else
report "Cannot validate: #{validator.problem}"
end

For PHP programmers, check out the Google APIs Client Library for PHP, in particular the function verifyIdToken in apiOAuth2.php.
UnOfficial Android Developers BlogThe owner of this website is a participant in the Amazon Services LLC Associates Program, an affiliate advertising program designed to provide a means for sites to earn advertising fees by advertising and linking to Amazon properties including, but not limited to, amazon.com, endless.com, myhabit.com, smallparts.com, or amazonwireless.com.